How to discover JupyterLab APIs
Learning from example
Setting the scene
The context for this document is that we have a JupyterLab extension which provides a new command (with shortcut). Right now, this command appears in all contexts, whereas we want to enable it only for notebooks.
To set about fixing this, how would one approach the JupyterLab code-base to figure out the proper code to write? We can start by listing our initial state:
Searching for example commands
I know that JupyterLab is hosted and developed on GitHub. This is helpful, because GitHub search is really powerful. You can use regular expressions, in particular, which is often a helpful way of searching for something specific across thousands of repositories (e.g. to answer the question “who is using this code”).
repo:jupyterlab/jupyterlab "render all markdown"We can use GitHub Search to find the string "render all markdown" in the jupyterlab repo (see Program 1). The "" quotes are used to search for the entire string, rather than OR across terms. We already know that we’re looking for a command, because that’s how menu-items are implemented (from our previous discussion). However, we won’t use the term command yet, because the search isn’t that good. See Figure 1 for a screenshot of my search results.
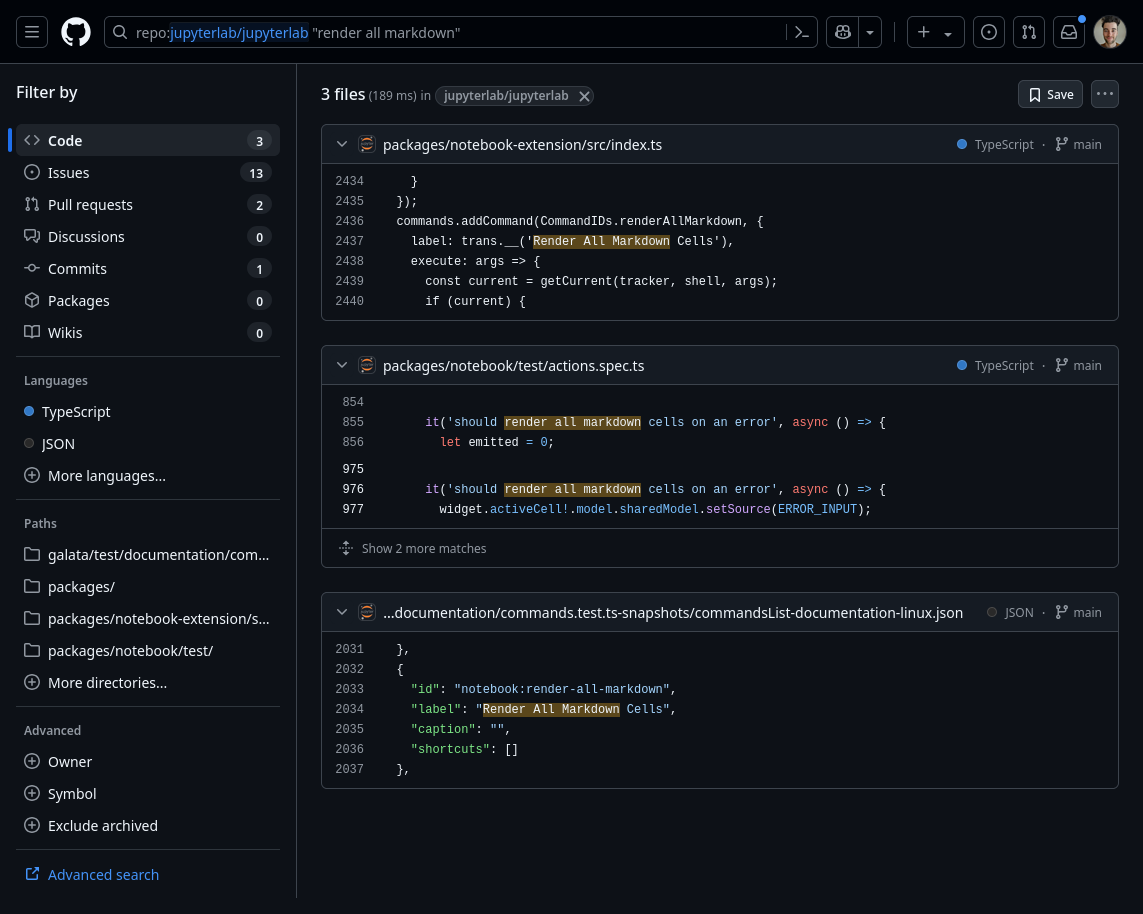
Figure 1:GitHub Code search results for the search query given in Program 1. There are hits in three files.
There are three results. Nice! Sometimes you’ll find a lot more hits, which just means the next step takes longer as one backtracks to try another result.
Filtering search results
When searching through a code-base, it can be useful to look at the test suite. However, oftentimes the test suite is actually not what we’re looking for, and matches against test files are unwanted. One usually has a sense of whether test files will help or harm your discovery process. In this case, we’re looking for actual commands that are registered in JupyterLab, which won’t be defined by the test suite. So, we can opt to ignore files that are tests with the following query:
repo:jupyterlab/jupyterlab "render all markdown" -path:testThe query in Program 2 excludes results that have test somewhere in the file path. That might be too permissive, but in our case it helps:
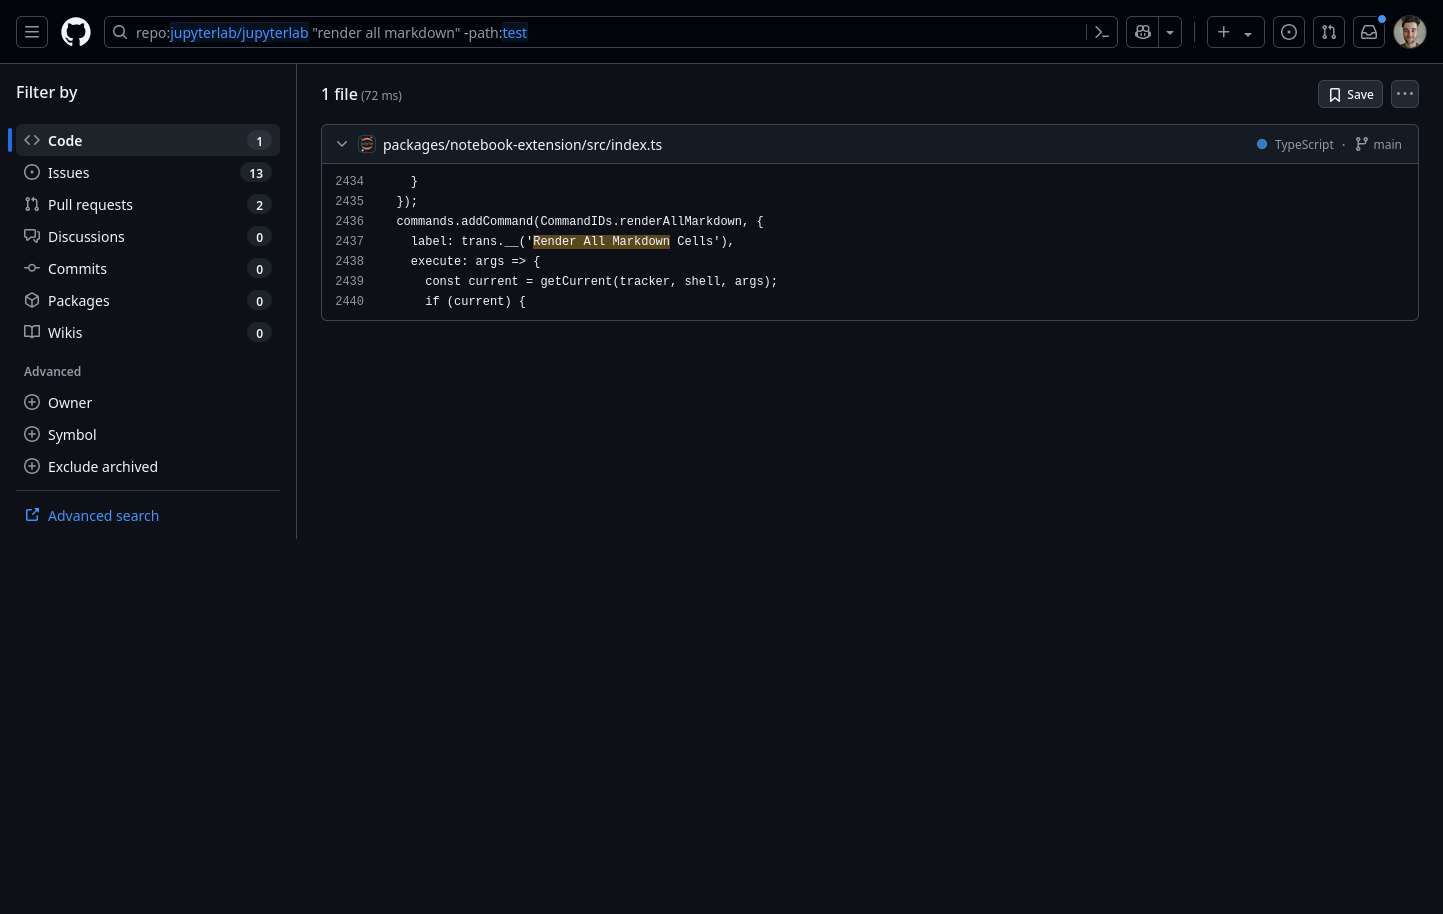
Figure 2:GitHub Code search results for the search query given in Program 2. There are hits in a single file.
This singular search result matches against a package called notebook-extension. The JupyterLab repository is a monorepo which is built together at the same time. This sounds promising!
Looking at our example
Now that we’ve found a file containing a known notebook-only extension, we can see whether it helps us to understand more about JupyterLab’s conditional command rendering. We’re already expecting to see the addCommand API method being used.
Let’s look at the file. We see an interesting member of this object callled isEnabled (see Program 3):
2436 2437 2438 2439 2440 2441 2442 2443 2444 2445 2446commands.addCommand(CommandIDs.renderAllMarkdown, { label: trans.__('Render All Markdown Cells'), execute: args => { const current = getCurrent(tracker, shell, args); if (current) { const { content } = current; return NotebookActions.renderAllMarkdown(content); } }, isEnabled });
This is probably the name of the function we’ll need to define to determine whether the command is active. See Learn by API docs for an alternative approach that we can also use to figure out how to use this function.
Learn by API docs
Walking through the reference
One of the easiest ways to find useful APIs is to search through existing code to find usages. If you’re into LLMs (and agree with their use), this is something that LLMs are quite good at. Once you’ve found usages, though, it can be helpful to pivot into using the API documentation that gives a technical picture of how to use the various application APIs. JupyterLab has its own API reference. First, let’s figure out who owns the addCommand method. The commands variable in Program 3 is defined above (see Program 4):
2201 2202 2203 2204 2205 2206 2207 2208 2209 2210 2211 2212 2213/** * Add the notebook commands to the application's command registry. */ function addCommands( app: JupyterFrontEnd, tracker: NotebookTracker, translator: ITranslator, sessionDialogs: ISessionContextDialogs, settings: ISettingRegistry.ISettings | null, isEnabled: () => boolean ): void { const trans = translator.load('jupyterlab'); const { commands, shell } = app;
We can see from the destructuring assignment that it belongs to the JupyterFrontEnd class instance app. Let’s look that class up in the API reference using the search (see Figure 3):
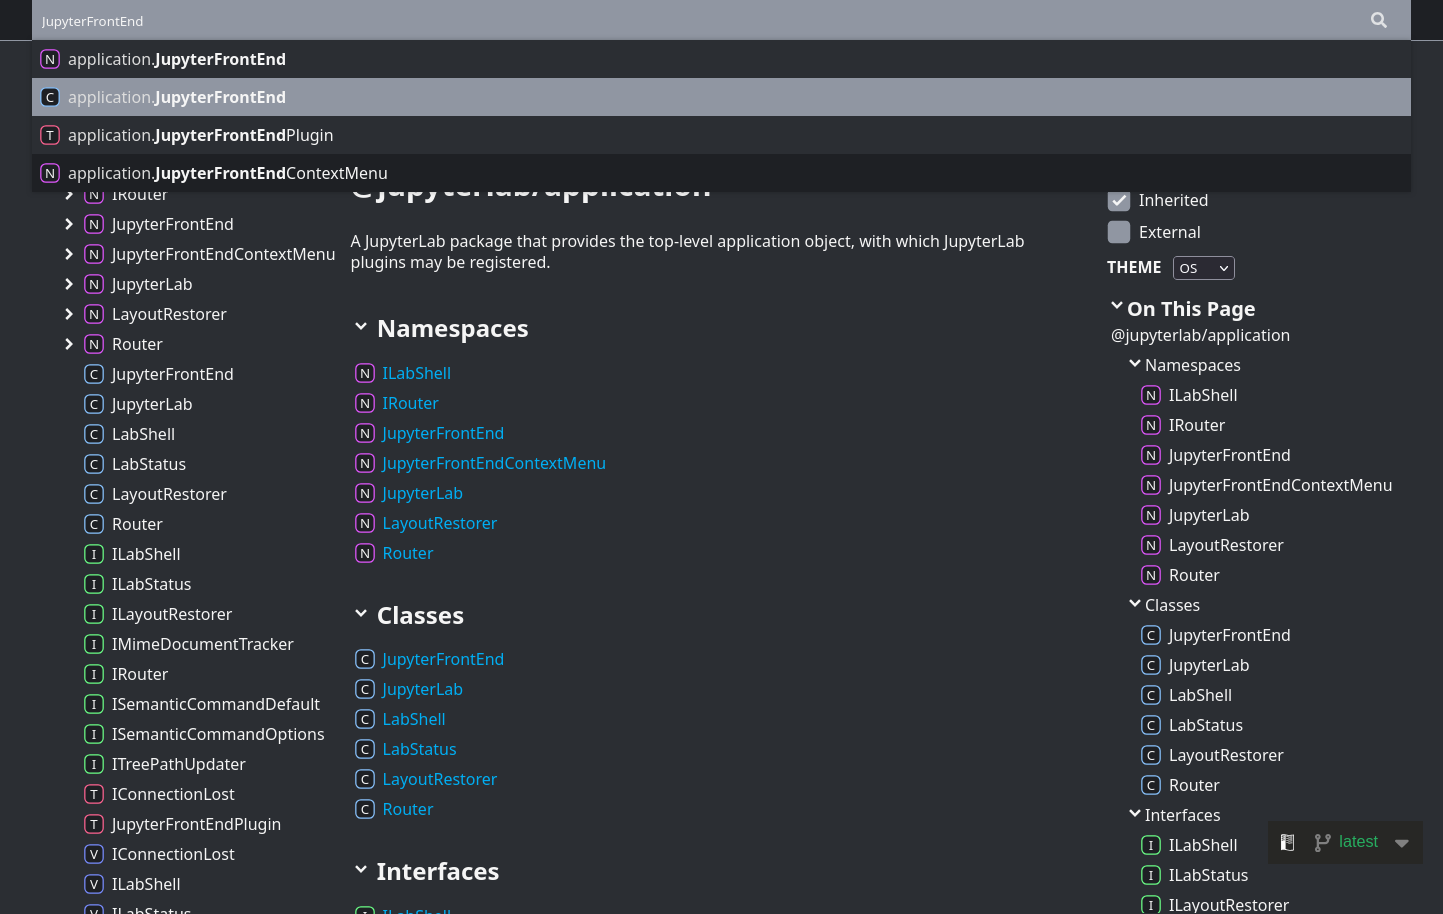
Figure 3:Screenshot showing search listings for the JupyterFrontEnd search term on the JupyterLab API documentation.
We have two hits for the singular name JupyterFrontEnd. In the left hand side we can see single-character icons N, C, and T for a subsequent listing. These stand for the following:
N- Namespace, a TypeScript mechanism for gathering implementations.
C- A TypeScript class definition.
T- A TypeScript type alias.
We’re looking for a class definition, so we’ll click the second result. On that page, let’s try and find a property called commands (see Figure 4):

Figure 4:Screenshot showing the properties of the JupyterFrontEnd class.
We can’t see anything called commands. Perhaps this property is defined by a superclass? Let’s checkout the heirarchy (see Figure 5).

Figure 5:Screenshot showing the hierarchy of the JupyterFrontEnd class.
There is a superclass called Application. Let’s look at that class’ properties (see Figure 6):

Figure 6:Screenshot showing the properties of the Application class.
Clicking on the commands member, we learn that it’s a CommandRegistry type (see Figure 7).
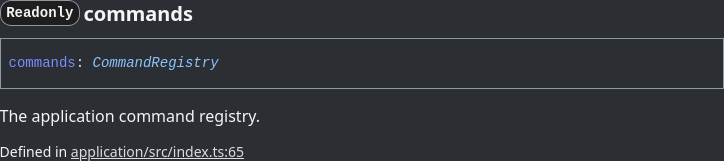
Figure 7:Screenshot showing the commands property of the Application class.
Now we can look at the type definition of the CommandRegistry class, visible in Figure 7 (see Figure 8):
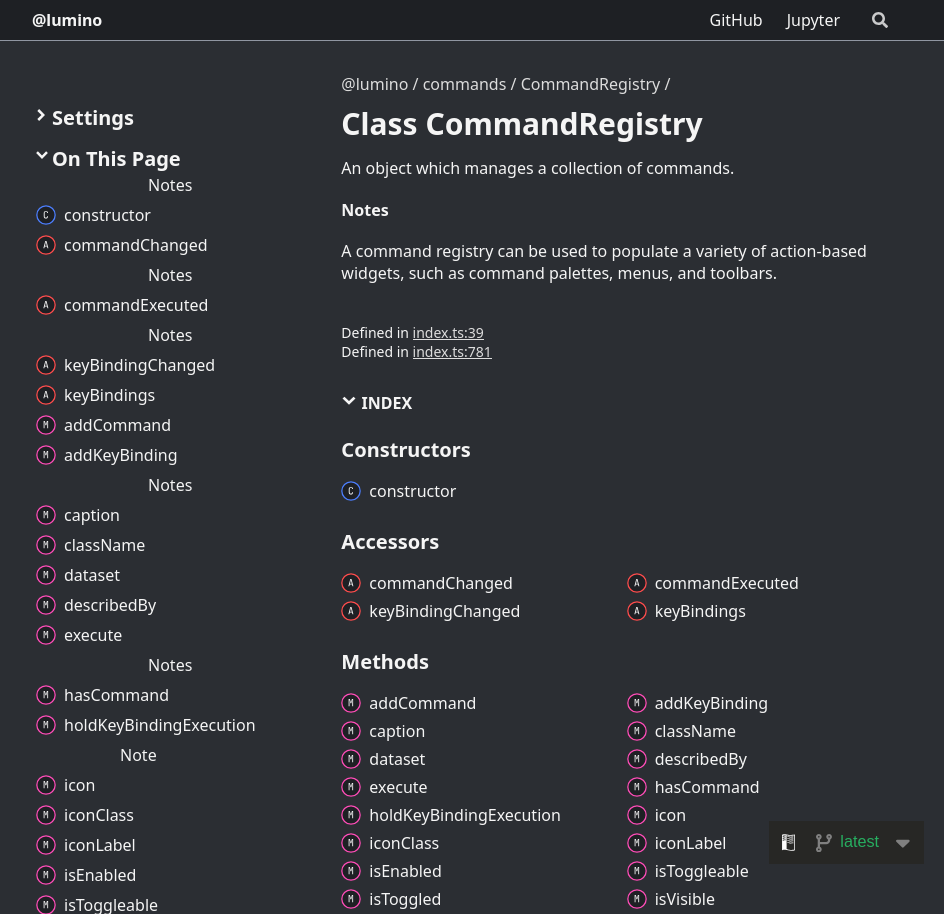
Figure 8:Screenshot showing the CommandRegistry class. Notice that the name of the documentation resource has changed in the top left from @jupyterlab to @lumino. This is because Lumino is a widget framework, built for and used by JupyterLab!
This class defines the addCommand method that we are already familiar with. Let’s now look at the signature of this method, by clicking on it (see Figure 9):

Figure 9:Screenshot showing the addCommand method of the CommandRegistry class.
We can see that this method takes some options, called options, of type ICommandOptions. Let’s navigate there (see Figure 10)!
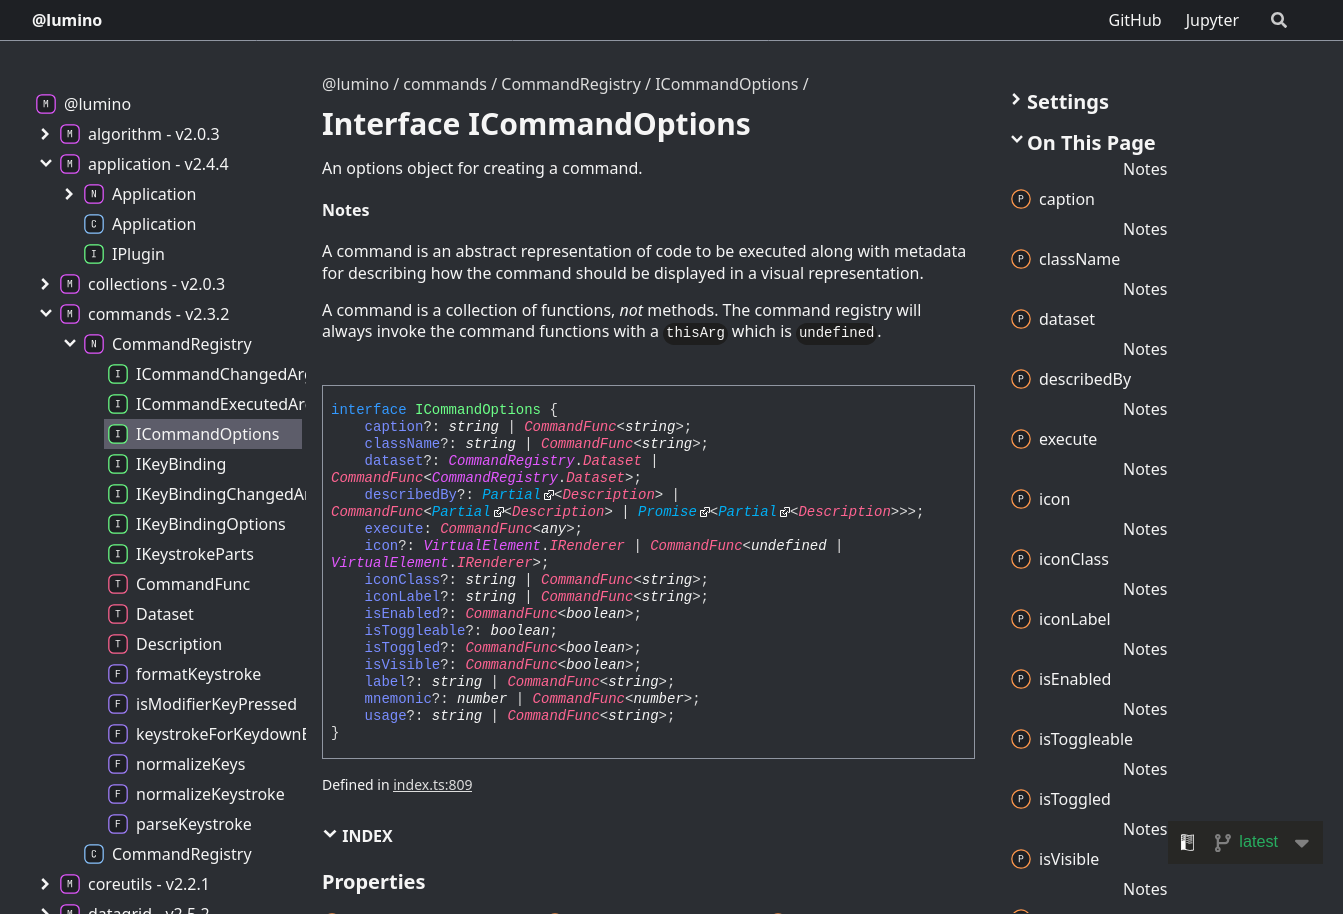
Figure 10:Screenshot showing the CommandOptions interface.
Here, finally, we see the isEnabled method that we were looking for! From the properties section of this API reference page, we can observe that the isEnabled member is optional, but if it is defined must confirm to some type CommandFunc<boolean>. Let’s click on CommandFunc, and figure out what that generic type actually resolves to (see Figure 11):

Figure 11:Screenshot showing the CommandFunc<T> generic type.
Summarising our findings
OK, so we’ve found that a command may define an isEnabled member. If it is defined, we should give it the type () -> boolean, which is TypeScript for a function that returns a boolean. What should this function test? See The business (logic) of enablement!
The business (logic) of enablement
Returning to our reference example in Looking at our example, the isEnabled function was actually passed in as a function argument to addCommands (see Program 4). We can go hunting for invocations of addCommands in the same module, and end up at L1776. That invocation uses a local variable isEnabled, defined much higher in the file. You can discover this by reading through the source code, or using GitHub’s helpful inspector which lets you click on variable definitions, which pops up with a symbol menu (see Figure 12):

Figure 12:Screenshot showing All Symbols view in GitHub.
Clicking the isEnabled definition on L593 jumps much higher in the file, as expected!
You’ll spot that this function is thin: it calls another function Private.isEnabled(shell, tracker). Private is a JupyterLab-specific convention: JupyterLab uses Private namespaces to define implementation that should not be used by other code. So, we already know that we shouldn’t be using the code here, but we can look at how it is defined for inspiration!
Let’s search within this file for namespace Private, which yields the namespace definition.
We can then find isEnabled nested within. It’s very simple (see Program 5):
3880 3881 3882 3883 3884 3885 3886 3887 3888 3889 3890 3891/** * Whether there is an active notebook. */ export function isEnabled( shell: JupyterFrontEnd.IShell, tracker: INotebookTracker ): boolean { return ( tracker.currentWidget !== null && tracker.currentWidget === shell.currentWidget ); }
The code in Program 5 is simply testing whether the current shell widget is the current tracker widget. This raises two questions ... what is a shell and what is a tracker? Let’s search the API docs for shell (see Figure 13) by first navigating to the JupyterLab API docs, away from Lumino:
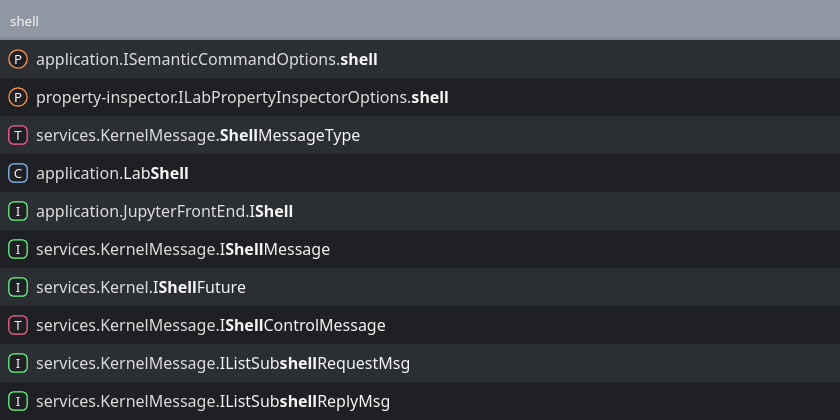
Figure 13:Screenshot showing the search results for shell in the JupyterLab API docs.
We can see many entries. Let’s choose the least nested, most important sounding one, i.e. the application.LabShell class. The resulting page states that shell is
The application shell for JupyterLab.
Not that useful a definition ... but we know it’s an “application shell”! What about the tracker?
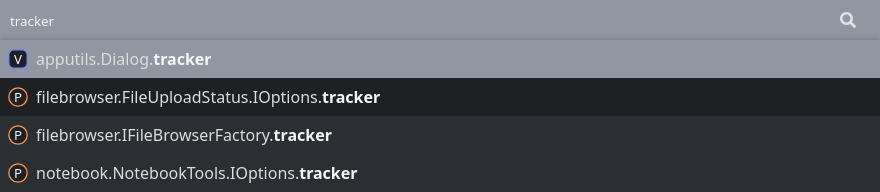
Figure 14:Screenshot showing the search results for tracker in the JupyterLab API docs.
We can search for tracker using the same logic. We see a notebook result that has a tracker property. There, we can see an INotebookTracker interface type. Let’s navigate there to learn about it. It says that the notebook tracker is
An object that tracks notebook widgets.
I think you can imagine what this means — there’s an object whose responsibility is keeping track of notebook widgets. I.e. Program 5 is checking whether the current notebook widget is the current application widget! It stands to reason that we can simply copy this.
Fin.